Having the need to remove the background of an image by isolating a figure or replacing it with a different one is something that, if you work with images on a regular basis, will have happened to you frequently.
If you are working on the photos on your website or, in a very typical case, if you run an online store, where you generally choose to remove the background from the product photos, you know what I mean.
Surely you have seen some applications on your mobile that do it and although for some time now there are some that achieve surprising results, they are not always as good as we would like.
We are going to see several options to remove the background with Photoshop. There are many other ways and by choosing well in each case you can achieve flawless results.
Remove background with Photoshop
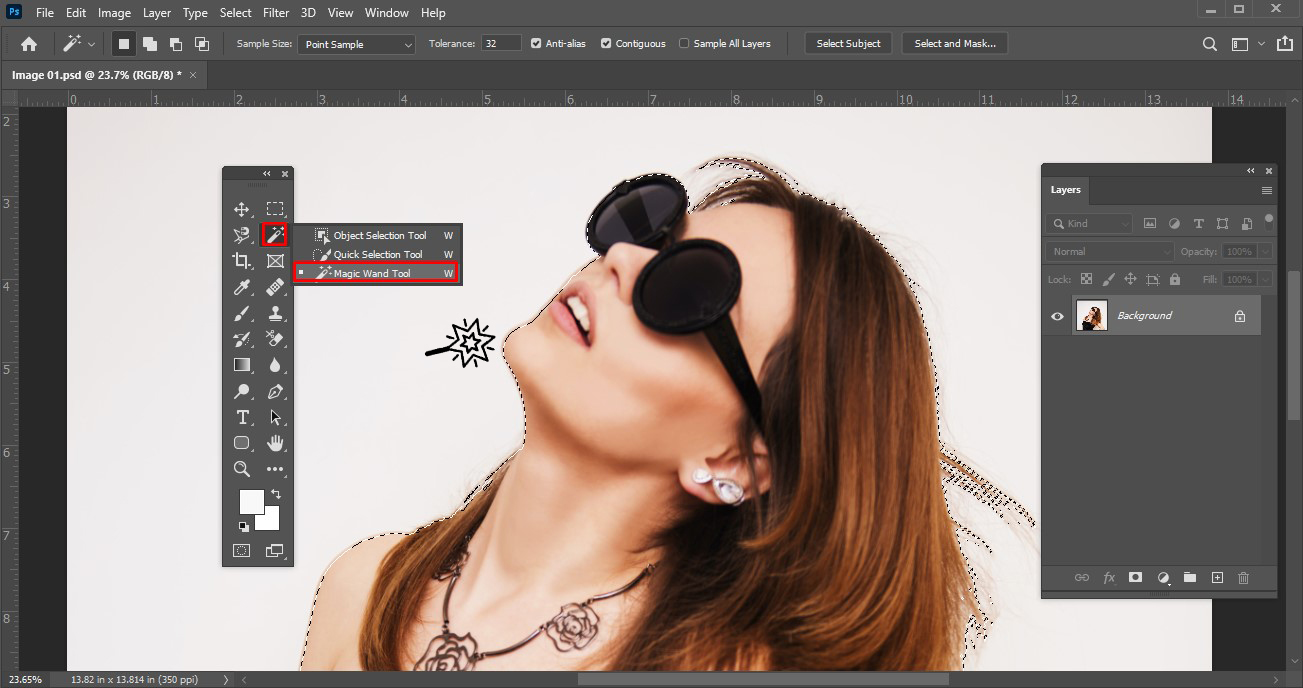
Magic wand
This tool is a classic. So much so that it has been with us since the first version of Photoshop back in 1990.
If you have a smooth background or, at least, relatively flat, it can solve the problem in a matter of seconds. You click on the area to be removed and the tool will select everything that is similar to the point you have clicked on.
If the object, the character, or what you want to isolate has poorly defined edges or the lighting causes it to blend in with the background in some area, you will see that the selection invades its interior.
To avoid this, you can modify the tolerance of the tool in its corresponding palette. Do tests to see how it works but remember, the wand may not be effective depending on what type of photos.
You can add zones to the selection by pressing the Shift key on your keyboard and clicking a zone again without selecting or subtracting them by pressing Option (Mac) or Alt (PC) and clicking a selected zone.

Quick selection tool
A similar tool that can be useful if you are in a hurry is the quick selection tool. You can define the size of the sampling brush with which you will select as if you were painting areas.
The size will define the tolerance in this case and you will see how your selection is approaching the limits that it finds near the brush step.
You can add zones by simply clicking and dragging your sampling brush. To subtract parts of the selection you can press Option (Mac) or Alt (PC) or take the same tool but with the minus symbol.

Pen Tool
This is almost always a more suitable method than the previous ones if it is executed correctly. Outlining an object with the pen has its technique and requires some practice to master. It is not that it is difficult, but it is not an automatic process like the previous ones and the final result will depend on the way of drawing the object.
The most important thing is not to leave a trace of the area we want to eliminate. It is preferable to lose a couple of pixels of the object but not have a halo around it. There are tools that would help us eliminate this effect, but we can avoid them by drawing with the pen slightly on the inside, avoiding any color that belongs to the outside.
For example, if you have a white mug on a green background, you need to zoom in enough to see if your path is picking up green pixels. Keep in mind that, as a general rule, the images generate a mixture of colors when the areas join.
In our example, the edge of the white mug will have a deep green on the outside (the background color), and right on the edge of the mug with the background a gradient from green to white.
Finally, you must convert your path to selection to isolate the object.

Channels
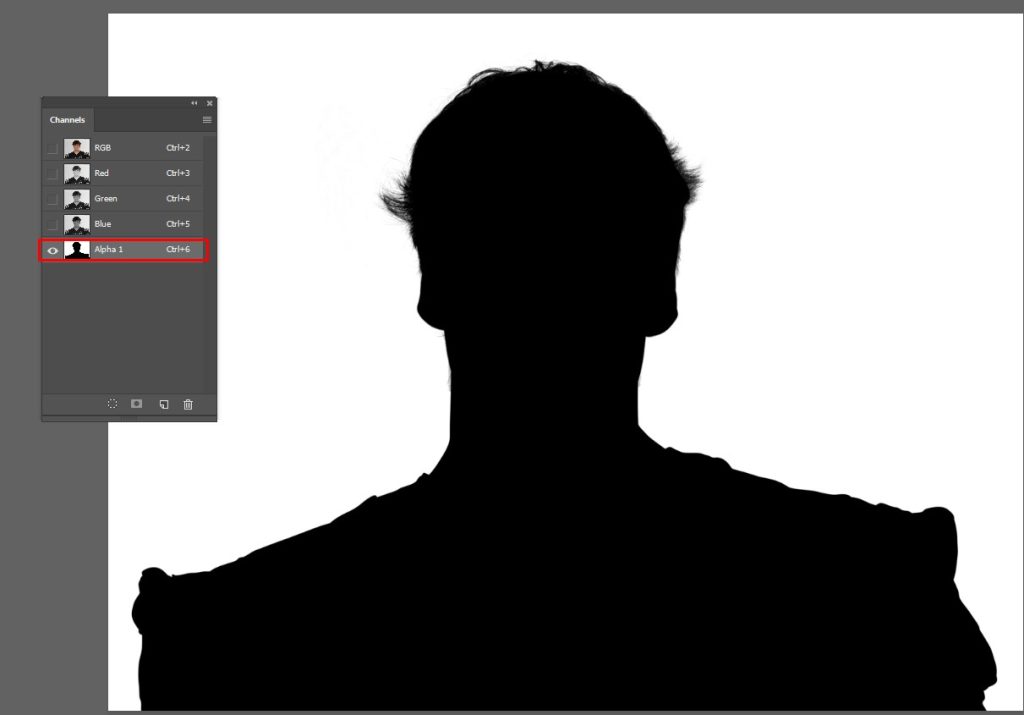
Removing the background using the channels is also an interesting technique. If you go to your palette of channels you will find, if your image is RGB, that there are precisely those three channels, red (Red), green (Green), and blue (Blue).
It is highly likely that one of these channels will help you isolate the object as long as you have a relatively flat bottom. If you show only one of them in the palette, you will see what that channel has. Use the one that generates the most contrast between the figure and the background.
Before modifying the chosen channel, duplicate it to work on the copy. If you don’t, the photo will be affected. With the Dodge and Burn tools and with Levels, Brightness / Contrast, and other Photoshop adjustments, you can force this contrast even more so that at the end of your edit you can select the content of the channel.
Continuing with our example, we should ensure that the cup remains in the chosen channel completely white, without a trace of leftovers or nuances, while the background should be as dark as possible.
That way you get to leave the object separated from the background and make a selection from the range of white colors you would have the job done. In the case of the image we are using, the selection would be from the black color range
conclusion
As you can see, all these methods are based on the selection before or after the process. You can improve it using, for example, Select and Mask within the Selection menu. This will allow you to fine-tune the result by softening the cut a bit, avoiding the halo effect, or making the boundary of the object fade slightly so that it blends in better with the new background.
There are many more methods to remove the background in Photoshop, these are some of the most used. Depending on your level, they will be simpler or less and you will be able to use even more complex techniques.
They are arranged in order of difficulty, so if you are just starting out, start practicing with the first one to better understand the process.
It will serve you for everything, the header image of your email marketing campaigns, the photos that you upload to your WordPress website, or if you are simply preparing the cover of the photo album of your vacation in the Bahamas.

Remove Background From GIF
2 Best Online Clear GIF Makers
Clear GIFs as stickers. They both have transparent backgrounds. To make GIF transparent, here is a list of 2 clear GIF creators online.
1. Lunapic
Lunapic is one of the best photo editors and transparent GIF makers. With it, you can create a GIF with a transparent background. Also, it allows you to edit GIFs like adjust GIF speed, remove the animation, optimize GIF file size, etc. Like a photo editor, it allows you to remove the photo background and do other advanced edits.
Here’s how to make a GIF transparent with GIF background remover – Lunapic.
Step 1. Open the Lunapic website and upload the GIF by clicking the Upload button.
Step 2. Next, hover your mouse over the Edit in the menu bar and select the last option – Transparent Background.
Step 3. Click on the background to start removing the GIF background.
Step 4. After that, hit the Apply to apply the change.
Step 5. Right-click on the clear GIF and save it from the internet.
Recommend Article: 4 Tips for Making a Photo Shine.
2. Free online image editor
Free Online Image Editor is a transparency maker that helps you remove background from GIFs and photos. Other than that, it supports adding text to GIF, adding an overlay to GIF, reducing GIF size, and so on. This online transparent GIF maker comes with all the editing tools you need, so let’s see how it works.
Step 1. Go to the free photo editor website online.
Step 2. Then upload the destination GIF from local. Also, you can load the GIF from the URL.
Step 3. After loading the GIF, switch to the Advanced tab.
Step 4. On this page, you need to choose the Transparency tool from the toolbar.
Step 5. Next, click on the white background of the GIF. After a while, you will see the white background disappear.
Step 6. At last, choose the Save button to save the transparent GIF.
Do you need to overlay GIFs on videos or images? See This Post: 2 Simple Ways To Add GIF Overlay To Your Video And Image.
Where to find clear GIFs
When it comes to GIF search engines, GIPHY and Tenor always rank at the top of the list. Let’s see how to find clear GIFs with them.
GIPHY
As one of the largest GIF search engines, GIPHY contains countless GIFs and they are all free to download. To find clear GIFs, just enter ‘transparency’ in the search bar and press the Enter key, and then you will see all the clear GIFs appear.
Tenor
Like GIPHY, Tenor also has tons of GIFs and allows you to download them without limits. It has some cute clear GIFs. To find them, just type ‘animated gif transparent background’ in the search bar. Then you can save the transparent GIF you like.
conclusion
This post offers you 2 easy ways to make GIFs transparent. Have you learned how to make a transparent GIF? If so, try it now!
Remove Background PNG
First, open the Gimp 2.10 tool; then, select the image that you like the most in your browser. Remember to always look for images free of copyright.
In my case, I have decided on my own image.

Then you will select the magic wand tool, in the menu on the left side of the screen (the one that appears in dark):
Subsequently, you click on the part of the photo that you want to disappear and then the “Delete” key on your keyboard. It will look like this:

And so you will go successively stopping on each part that you want to eliminate the background.
There will be parts that you will not be able to remove in this way, as you can see below:

Then, when you go to the upper menu, you will click on the “select” tool —–> click on ” nothing “.
So you will go back to the left menu, you will click on the eraser tool:

Expand your image at the bottom of the program, for best results:
![]()
Then in the left menu, you will select the type of eraser you want. I chose this:

And you will begin to remove the defects that you could not remove with the wand.
Finally, having completed the total removal of the background, you should have something like this:
To finish, you go to the top menu —-> file —-> export as —-> name of your job and, you should have something like this:


Remove Background Online Tools
Removing Background Online from an image may seem like a simple operation that does not require special effort. You can at least think that until you try to cut hair or other fancy objects from a photo for the first time.
In the past, a time-consuming process, removing the image background has become a breeze today.
The advent of artificial intelligence has revolutionized many industries and photo editing is no exception. This state-of-the-art technology enables professional photographers and casual users to enjoy creating stunning images and removing background in minutes.
The modern digital market offers us dozens of image enhancement tools and background removers with artificial intelligence technology. However, are they all doing their job well?
Unfortunately, the AI-powered algorithm does not mean that the software always delivers perfect results. Many background removers still use picking tools that are far from perfect.
So, let’s take a look at the three most popular ones.
HOW TO REMOVE THE BACKGROUND OF AN IMAGE ONLINE 3 TOOLS

Removal.AI – Intuitive and Free
Removal.AI is a newly launched online tool that uses AI technology to automatically remove the background from the image.
Simply drag and drop your image, in a few seconds you will get the desired result. You can download an image resolution of up to 1500 x 1000 pixels for free.
Like most other fund removal tools, Removal.AI also offers a paid subscription that allows users to purchase credits, spend this credit to download high-resolution images up to 6250 × 4000 pixels, 1 credit = 1 image.

InPixio – Quick, Easy, and Free
Today, you don’t need to be a Photoshop genius to properly edit your photos. With a range of easy-to-use tools available, anyone can give it a go with professional results.
That said, removing backgrounds from images is still a complicated and sometimes time-consuming task, especially if you are working on multiple images.
It is with this in mind that InPixio has created the new “Remove Background” tool.
This free editing app makes it easy to remove backgrounds from photos and other images. The tool is designed to be easy to master, allowing users to accurately identify and remove image backgrounds with just a few clicks.
A trusted tool for personal and commercial use, this free photo editing site does exactly what its name suggests – it removes backgrounds with ease to provide the perfect base for photomontages and other creations.
The summary: a versatile and easy-to-use tool for everyone
In this age of e-commerce and social media were fast and effective photo editing has become a daily chore, it is invaluable to have access to quality free tools that help make our lives easier and our photos more beautiful.
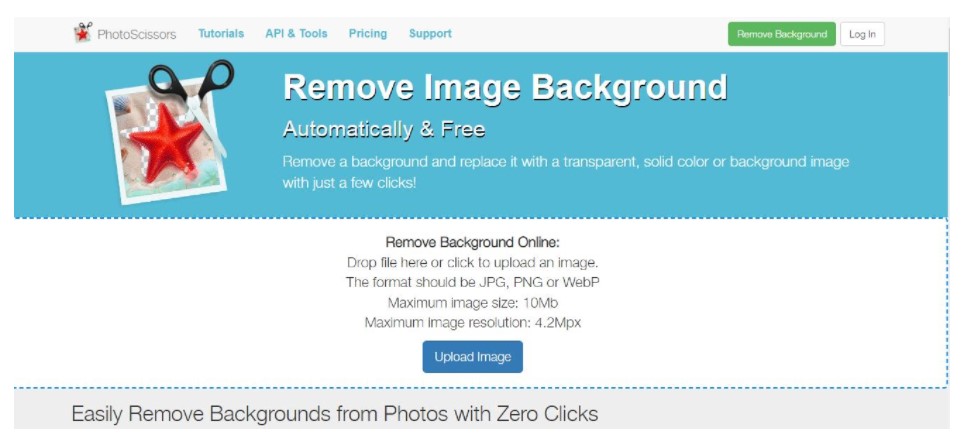
PhotoScissors is another background removal tool that prides itself on its high efficiency and ease of use.
To remove your backgrounds with PhotoScissors, start by uploading the image in a . JPG, PNG, or . WebP file. Make sure the image has a maximum size of 10 Mb and a maximum resolution of 4.2Mpx.
After uploading your image, PhotoScissors algorithms will kick in, removing the background from your photo using deep neural networks.
PhotoScissors can remove the background around the hair, transparent objects, and even images with a variety of colored backgrounds.
conclusion
If you are not a professional designer, we hope this list of useful tools will help you remove the background from any image easily and quickly, even externally using specialized software.


