Use a Clipping Mask in GIMP to remove excess parts of the photo
Well, let’s see how to use a Quick Page (QP) of several photos to create our layout.
In a previous tutorial, we made a layout using a Quick Page for a single photo.
If you have not seen it, I advise you to stop by and practice the simple quick pages, before starting with the multiple photos. Not that they are difficult, but they are a little more laborious and we are going to use different techniques.
Why are we going to use different techniques with several photos?
In a QP you will see that there are transparent areas. They are the holes enabled to place your photos. But, when there are holes for several photos, many times they are next to each other. Sometimes the holes for the photos are too close together. And sometimes, they even overlap.
Many times, in those gaps, we only want to show a part of the photo. And what happens to us? It happens that, when placing the photo behind the QP, there are parts that can be seen through the holes provided for other photos. How do we solve this? Using a Clipping Mask in GIMP.
Are you ready? Here we go!
We are going to use Clipping Mask in GIMPs.
For this tutorial, we are going to use Gimp.
The truth is that to use Clipping Mask in GIMPs, it is preferable to use Photoshop, where the process of using this tool is much more comfortable and easy.
But Gimp is free image editing software that will help you while you decide to invest in paid software.
Still don’t have Gimp installed on your computer? You can download Gimp here. In the previous tutorial, where I explained how to use a simple Quick Page, you can see how to download and install it, step by step.
So let’s create our layout using a Quick Page for multiple photos.
Do you already have your Gimp open?
Open it and follow the tutorial doing it, step by step, with me.
Step 1: Create a new image in Gimp
This is the first step, for anything we do in digital scrapbooking: Create a new file to work on.
In the previous tutorial, where I explained how to use a simple Quick Page, you can see this step in more detail. But it is simple and, by repeating it in each layout, it will become one step, almost automatic:
- Click File> New. To make it faster, use the keyboard shortcut: Ctrl + N.
- In Image Size, you must put the same size as the Quick Page you are going to use. In this case, it is the classic size:
– Width: 3600 pixels (px) , which is 12 inches or 30.48 centimeters.
– Height: 3600 pixels (px), which is 12 inches or 30.48 centimeters.
- Press Advanced options:
– Resolution: 300 pixels per inch (dpi) . Optimal for printing your layout.
– Color Space: RGB
– Accuracy: 8 bits
– Fill with Transparency
- Click OK, and your new document will open.

Step 2: Save the layer file you are working on
This is also a routine step. What should we do after creating the document in which we are going to work? The objective is to save what we are doing so that it is not lost by accident, as we are working on our image file.
To save this layer file, native to Gimp, that we have created and in which we are going to work:
- Go to the Top Menu and click File> Save. To do this faster, use the keyboard shortcut: Ctrl + S.
- Name your CXF file. Find the folder where you want to save it, and click Save.
- As you work on this document, press: Ctrl + S, from time to time, so that the changes you make are saved, and nothing is lost.

Step 3: Open, as a layer, the Quick Page and one of the photos that you are going to use
For this tutorial, I am going to use one of the QPs included in the Quick Pages-1 (QP) pack, from the Sweet Childhood Collection. If you want to download it, for free, to practice, you just have to subscribe to the Digital Memories mailing list.
1. Open your Quick Page as a layer
- In the top menu click on File> Open as Layers. To make it faster, use the keyboard shortcut: Ctrl + Alt + O.
- Find the folder where you have saved the Quick Page (QP) you are going to use, select it and click Open.
2. Open one of the photos you are going to use as a layer
Now we are going to open one of the photos that we are going to use. As it is a page of several photos, I advise you to choose photos that are related to each other, so that, together, they tell a story.
I have chosen some photos of my son, riding on a boat ride in the Amusement Park.
Choose your photos and open one of them, like Layer. Following the steps above.
3. Place the photo layer below the QP layer
Once open, you must place the layer of the photo, below, the layer of the QP :
- Activate the photo’s layer, in the layers panel, by clicking on it.
- Click, and holding down the right mouse button, drag the photo layer, until it is placed just below the QP layer.
4. Place the photo in the chosen hole
Choose the hole in the QP where you are going to place the photo.
Position it in the hole, using the Move Tool (click and drag).
If it’s too big or too small, resize it, using the Scaling Tool (click on a corner and drag in to decrease the size and out to enlarge). We will explain this in detail in this tutorial.
5. The problem we find ourselves with
In these cases, we find a problem: As the gaps are very close together, the photo is seen through more than one of the gaps. Does the same thing happen to you?
To avoid showing those parts of the photo that we do not want to show, we are going to use a Clipping Mask in GIMP.
Step 4: Create a Clipping Mask in GIMP
Clipping Mask in GIMPs is like our digital scissors. They don’t cut anything. What Clipping Mask in GIMPs does is show what we want to see, and hide what we don’t want to see.
In this step, we are going to make a Clipping Mask in GIMP that shows only the part of the photo that has to be seen through the hole in the QP that we have chosen to place it.
1. Create a New Layer
We are going to create a new layer, to build our Clipping Mask in GIMP, to measure:
– Go to the Top Menu, and click on Layer. A new Menu will open for you.
– At the top of that new Menu, click New Layer. To make this step faster, you can use this shortcut: Shift + Ctrl + N.
– A window will appear where you can name the new layer. I have called it Mask-1. You can also label it with a color, to easily identify it in the layers panel. I have chosen the color red. For the rest of the parameters, leave them as is, and click OK.

2. Create a selection that fits the gap where you are going to place the photo
We are going to establish the shape of our Clipping Mask in GIMP, creating a selection:
– First of all, in the layers panel, you will see that there is an eye to the left of each layer. It is used to make the layer visible, or invisible. Click on the eye of the photo layer to make it invisible. It has disappeared, but it is still there!
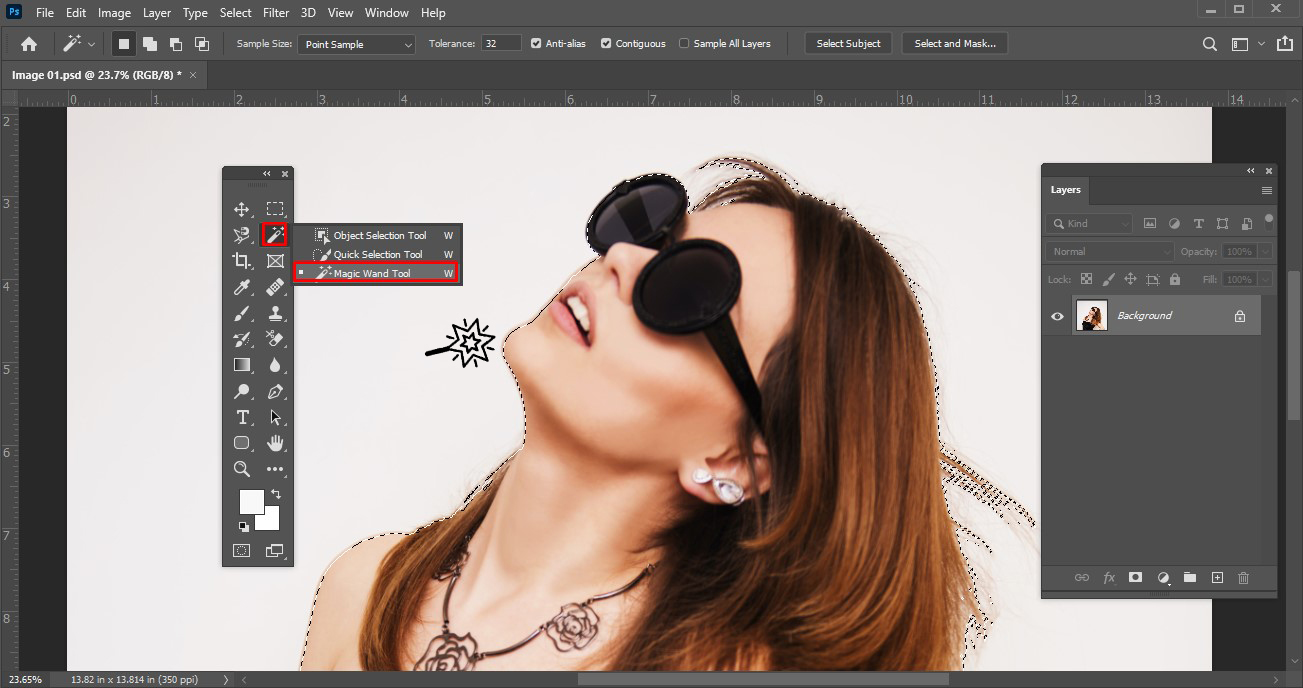
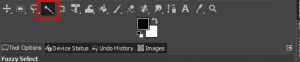
– Go to your Gimp’s Toolbox, and select the Magic Wand or Fuzzy Selection Tool. It is an icon that shows, precisely, a magic wand. This is the magic wand of digital scrapers! 😉
– The mouse pointer has turned into a magic wand.
– In the layers panel, click on the QP layer to activate it.
– Click with the pointer in the hole where you are going to place the photo. You will see that the entire outline appears, now, dotted (like little ants walking in a row).

– Well, now, we are going to enlarge the selection so that it is a little bigger than the hole, and covers it, perfectly. To do this, go to the top menu, click on Select. A sub-menu will open, choose the Enlarge option. A new window will appear so that you can put how many pixels you want to enlarge the selection. Put 30 px and click OK. You will see that the selection has gotten a bit bigger.
– You can now activate the eye of the photo layer so that it is visible again.
3. Fill the selection you have created with paint
We are going to finish making our Clipping Mask in GIMP. To do this, we are going to materialize it using the Paint Pot.
– Click on the mask layer and mark it in red.
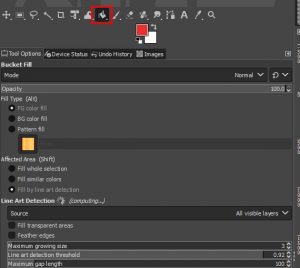
– Go to the Gimp Toolbox and select the Fill Tool, by clicking on the paint pot icon. You’ll see the pointer transform into a little paint pot, too.
– On the left, in the Tool Options Panel, select Fill with the foreground color. This color is the one shown in the square in front, in the color selector, which is under the Toolbox. Click on the little icon with a black square in front and a white square behind it. This will change the font fill color to black.
– Now you have your Paint Bucket full of black paint, to fill the Clipping Mask in GIMP. Click inside the selection you created (the one with the little ants). The selection will be painted black. You already have your custom Clipping Mask in GIMP.
Step 5: Use your Clipping Mask in GIMP to crop the photo
We have made a Clipping Mask in GIMP. Now, we are going to use it to hide the parts of the photo that we do not want to be seen.
1. Turn off the Selection around the mask
We are going to get rid of the row of ants that surround the mask because we no longer need them.
In the top menu, click Select, another Menu will open. Click the Nothing option. Will, you faster using the keyboard shortcut: Shift + Ctrl + A.
2. Activate Alpha to Selection on the mask layer
We still have the mask layer selected in the Layers Panel.
- Click on it with the right mouse button. A Menu will appear, full of options.
- Click on the option: Alpha to Selection (it is at the bottom of the Menu). The ants will reappear.

3. Fill with the background-color
Now go to the Top Menu and click Edit. Another Menu will open for you.
Click on the option: Fill with the background color. The Mask will turn white.
Everything is going well!

4. Copy the Mask
Click again on Edit and select the option this time: Copy, you can do this faster with the keyboard shortcut: Ctrl + C.
5. Add the Mask to the photo
Now we are going to add the Mask to the photo. Right-click on the photo layer.
In the Menu that opens, click on the option: Add Layer Mask. A new window will appear.
From the options, it shows you, choose the option: Black (full transparency), and click Add.
What little was seen of the photo will have completely disappeared. This is good!
6. Paste the mask
In the layers panel, take a look at the photo’s layer, and make sure it’s selected. Notice that next to the thumbnail of the photo, a frame with a white border has been created
. That, too, is good!
It is time to make the masked photo appear. To do this, click Edit> Paste. It is faster if you use the keyboard shortcut: Ctrl + V.
You do not see? Do not panic! Turn off the eye of the mask layer.
Now you see the photo inside its hole, and nothing sticks out!
7. Anchor the Floating Layer
Anchor the Floating Layer by clicking the green anchor icon at the bottom of the Layers panel.

8. Remove the Clipping Mask in GIMP
You can now remove the Clipping Mask in GIMP. You just have to activate it and click on the cross that you will see in the lower right corner of the Layers panel.
9. Save the work you are doing
Do not forget to go saving the document, from time to time, not to lose the work you’re doing: Ctrl + S.
In Photoshop, all this Step 5, which with Gimp is a bit laborious, is done with a simple click. But, if you don’t have Photoshop, you can do it this way. It’s not that much either!
Step 6: Arrange the rest of the photos to their holes
Now we are going to repeat steps 3, 4, and 5 until we fit the rest of the photos in the different holes.
Surely, you don’t have to apply a Clipping Mask in GIMP to every photo. In most cases, you will only need to resize with the Scaling Tool and move the photo to fit the hole.
Also, as you practice, you will become more fluid.

You will see!
Step 7: Add the Title and Journal to your layout
You can add the Title using an Alpha or using Text. If you use an Alpha, you must open as a layer (Ctrl + Alt + O), each letter, one by one, until each word is formed.
You must resize it, with the Scaling Tool and place it in the corresponding place. You can help yourself from the Guides if you place the letters aligned.
You can also add a touch of realism to your Title using a shadow effect: Press Filter> Light and Shadow> Drop Shadow (inherited).
To create the Journal, use the Text Tool.
You can consult all the steps to do it, in detail in How to use a simple Quick Page to make a layout with Gimp.
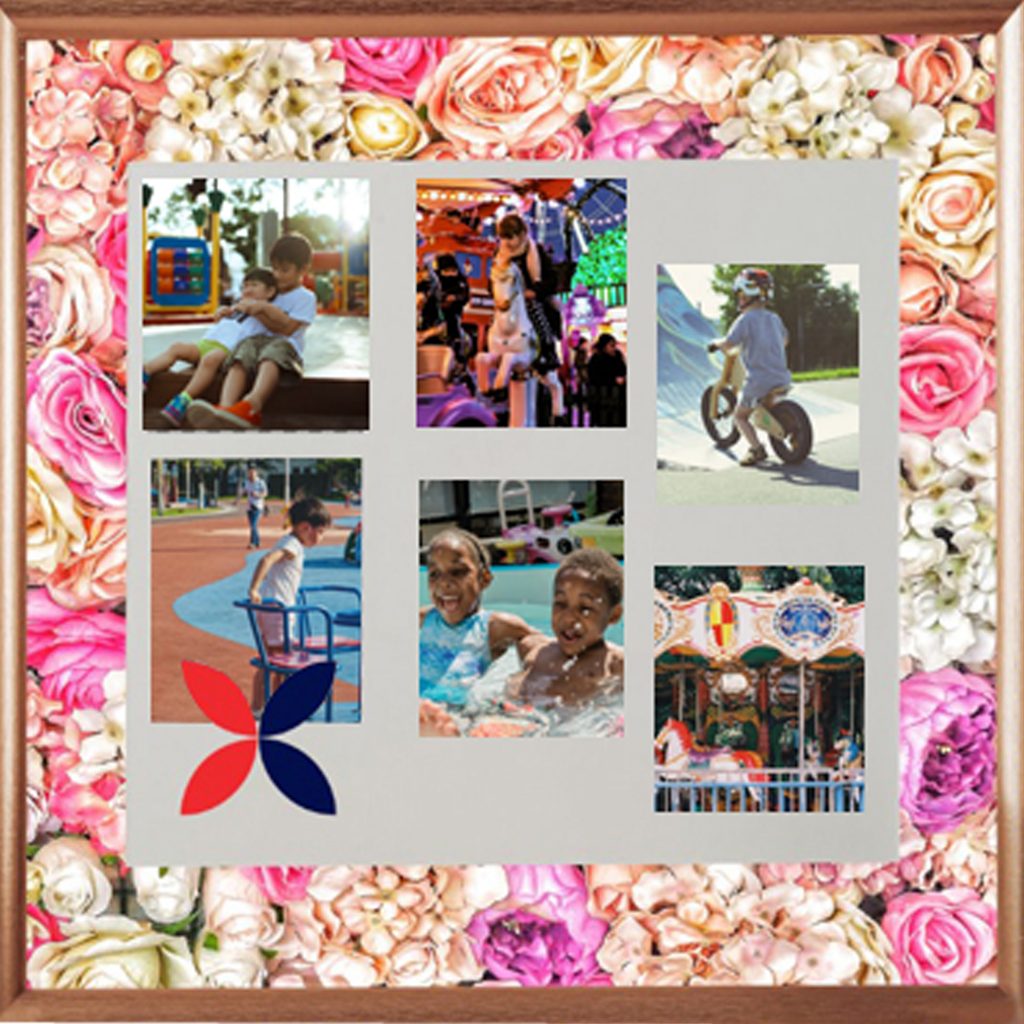
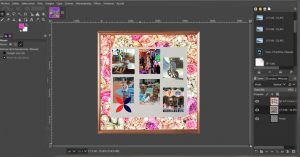
This is how my finished layout has been:
Well, we have made a layout using a Quick Page (QP) of several photos, in Gimp.
We have used a Clipping Mask in GIMP to cut off the excess parts of the photo.
You have learned how to create a Clipping Mask in GIMP and how to use it in Gimp.
With Gimp the process is longer, but it is only a matter of practice.
I would love for you to leave me a comment telling me your experience, your doubts, your difficulties, and how the result has been. I am at your disposal to help you with whatever you need.